Everyone who has followed the VMware Infrastructure 3 four day course will know how to install Sysprep on your VirtualCenter so you are able customize new VM's during their deployment. But for people who are just playing around with it still, not having followed the course or people that have to dig really deep in their memory (like me) in order to come up with it again, I've created this small post. (their doesn't seem to be lots of info on this on-line ...)
Sysprep is not installed and distributed by VMware for a good reason. Sysprep is free for end-users like ourselves, but not if you want to distribute it ...
So instead of having you pay VMware for Microsoft technology, they just tell you download and install it yourself.
The steps are fairly simple, but the path to which to copy the files are mostly the problem:
1. Download the
Sysprep Update Version 1.1 (Q257813_W2K_spl_X86_EN.exe) from Microsoft at
this link (if they haven't changed it again).
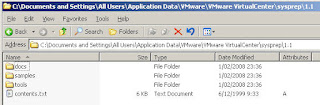
Info: Validation will be required.2. Extract the package and copy the files to the directory
C:\\Application Data\Vmware\VMware
VirtualCenter\sysprep\1.1. The result should look like this:
3. Download the
Windows Server 2003 Service Pack 1 32-bit Deployment Tools (WindowsServer2003-KB892778-SP1-DeployTools-x86-ENU.cab) from Microsoft at
this link (if they haven't changed it again).
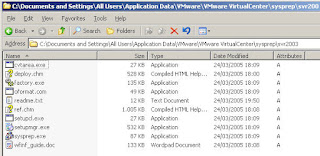
4. Extract the package and copy the files to the directory
C:\\Application Data\Vmware\VMware
VirtualCenter\sysprep\Svr2003. The result should look like this:
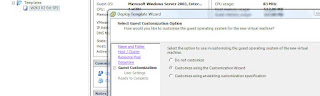
Now, we can use the
Customize using the Customization wizard option at the template after which you can specify all the desired settings.
Of course, easier still, is sysprepping the VM you want to convert to a template prior to doing so. If an unattend setup is specified, the VM's that are deployed from this template will automatically have all the correct settings, specified in the unattend file.
How to sysprep a machine is not included here since there are hundreds of step-by-step guides of this on-line.
Have fun!


