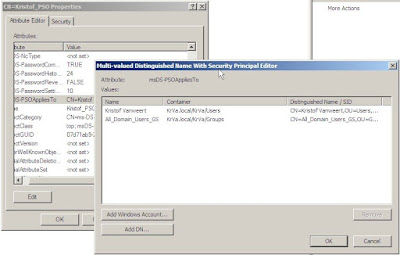
OK, last step. Everything has been configured in both domains. All that is left to do is "trusting" the partners by exporting and importing the created policies.
STEP 6: FS - Creating both sides of the federation trust
To do this, we have to perform 5 simple steps: export the policy from the account domain, import the policy in the resource domain, create the claim mapping in the resource domain, export the partner policy in the resource domain and import that policy in the account domain.
A) Export the Trust policy (Account domain)
1. Open Active Directory Federation Services and right-click the Trust Policy to Export Basic Partner Policy and safe it to any location.
2. E-mail the XML file to the administrator of the Resource domain
B) Import the Trust policy (Resource domain)
1. Open Active Directory Federation Services and browse to Trust Policy --> Partner Organizations and right click Account Partners to add a new Account Partner.
2. In the wizard, browse to the XML file you received from the partner and check if the details displayed are correct.
3. Then, select to Use the verification certificate in the import policy file before continuing.
4. If you are setting up FS between 2 forests that do not have a trust configured between them, select Federated Web SSO and click Next.
5. In the Identity claims option, select UPN claim and E-mail claim, after which you provide DNS suffixes and Enable this account partner.
C) Create the claim mapping (Resource domain)
1. Open Active Directory Federation Services and browse to Trust Policy --> Partner Organizations --> Account Partners and right-click the partner to add a new Incoming Group Claim Mapping.
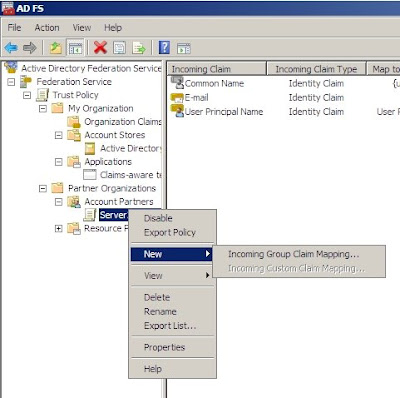
2. Enter a name and make sure you select the correct organization group chain (in this case, there is only one)
D) Export the Partner policy (Resource domain)
1. Open Active Directory Federation Services and browse to Trust Policy --> Partner Organizations --> Account Partners and right-click the partner to Export Partner Policy and safe it to any location.
2. E-mail the XML file to the administrator of the Resource domain
E) Import the Partner policy (Account domain)
1. Open Active Directory Federation Services and browse to Trust Policy --> Partner Organizations and right click Resource Partners to add a new Resource Partner.
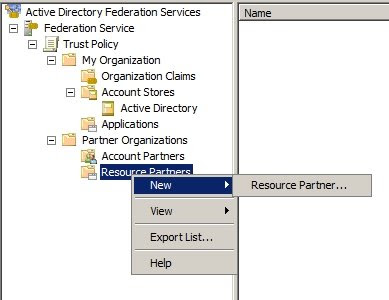
2. In the wizard, browse to the XML file you received from the partner and check if the details displayed are correct.
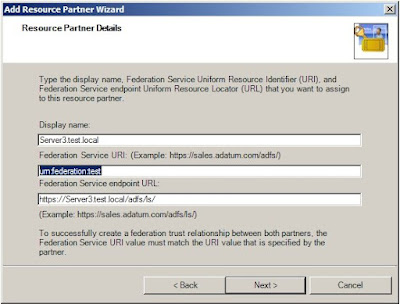
3. If you are setting up FS between 2 forests that do not have a trust configured between them, select Federated Web SSO and click Next.
4. In the Identity claims option, select UPN claim and E-mail claim, and verify that the DNS suffixes are adding the DNS suffix of the Account Domain.
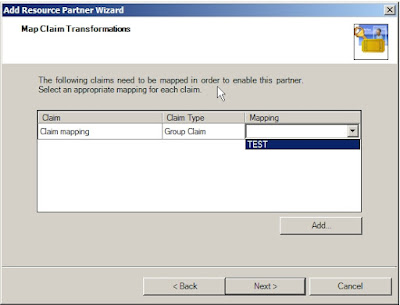
5. On the Map Claim Transformations page, under Mapping select the ClaimApp Claim (TEST in my case), then click Next and select to Enable this resource partner.
There, that’s it. As promised, it was quite a long way. But now that it's working, it feels pretty good doing stuff that not too many other people do, am I right? :)
If you are having problems, to troubleshoot check that:
1. the client PC has the DNS IP-adresses of the DNS servers in both domains configured
2. the FS servers have been added to the trusted sites of the local intranet in your internet explorer
3. if you are setting this up in a test environment, make sure the routing between both domains is working.
Federation Services setup posts:
1. Setting up Federation Services (FS) in a Windows 2008 (WS08) environment: Part 1: Overview and installation
2. Setting up Federation Services (FS) in a Windows 2008 (WS08) environment: Part 2: Configure IIS to use SSL on the FS servers
3. Setting up Federation Services (FS) in a Windows 2008 (WS08) environment: Part 3: Configure the FS certificates
4. Setting up Federation Services (FS) in a Windows 2008 (WS08) environment: Part 4: Configuring the FS server in the Account domain
5. Setting up Federation Services (FS) in a Windows 2008 (WS08) environment: Part 5: Configuring the FS server in the Resource domain
Friday, November 28, 2008
Setting up Federation Services (FS) in a Windows 2008 (WS08) environment: Part 5: Configuring the FS server in the Resource domain
In my last post, we configured the FS for the account domain. Now let's complete the FS setup by configuring the FS in the resource domain.
STEP 5: FS - Configuring the Federation Servers (Resource domain)
To set up the Federarion Services in a resource domain, you need to perform four steps: trust policy, group claim, the infamous account store configuration & configuring the claims-aware application.
A) Trust policy configuration
1. Setting up Federation Services (FS) in a Windows 2008 (WS08) environment: Part 4: Configuring the FS server in the Account domain
B) Creating the group claim for the claims-aware application
1. Setting up Federation Services (FS) in a Windows 2008 (WS08) environment: Part 4: Configuring the FS server in the Account domain
C) Creating the AD DS account store
1. Setting up Federation Services (FS) in a Windows 2008 (WS08) environment: Part 4: Configuring the FS server in the Account domain
D) Configuring a claims-aware application
Here it starts getting different. Since we don't have the security group in this domain, we can't simply add it here. Instead, we add a claims-aware application:
1. Open Active Directory Federation Services and browse to Trust Policy --> My Organization and right click Applications to add a new Application.
2. In the Wizard, choose Claims-aware application, then enter a name and in the URL point to the application you created earlier.
3. Select User principal name (UPN) as a Accepted Identity Claim and Enable the application.
Federation Services setup posts:
1. Setting up Federation Services (FS) in a Windows 2008 (WS08) environment: Part 1: Overview and installation
2. Setting up Federation Services (FS) in a Windows 2008 (WS08) environment: Part 2: Configure IIS to use SSL on the FS servers
3. Setting up Federation Services (FS) in a Windows 2008 (WS08) environment: Part 3: Configure the FS certificates
4. Setting up Federation Services (FS) in a Windows 2008 (WS08) environment: Part 4: Configuring the FS server in the Account domain
6. Setting up Federation Services (FS) in a Windows 2008 (WS08) environment: Part 6: Creating the federation trust on both sides
Setting up Federation Services (FS) in a Windows 2008 (WS08) environment: Part 4: Configuring the FS server in the Account domain
In my last post, we created and imported our necessary certificates. Quite a bit of work, but when you think about it, pretty straightforward.
Now that we have our domains in order, our FS installed and our certificates out of the way, let's configure the Federation Services.
STEP 4: FS - Configuring the Federation Servers (Account domain)
To set up the Federarion Services in a domain, you need to perform three steps: trust policy, group claim & infamous account store configuration.
A) Trust policy configuration
1. Open the Active Directory Federation Services and open the Properties of the Trust Policy
2. In the Federation Service URI, type urn:federation: (case sensitive)
3. In the Federation Service URL, type https://.FQDN/adfs/ls
4. Then add a name in the Display Name tab
B) Creating the group claim for the claims-aware application
1. Open the Active Directory Federation Services and browse to Trust Policy --> My Organization --> Organization Claims and create a new Organization Claim.
2. Enter a name and make sure the Group Claim is selected.
C) Creating the AD DS account store
1. Open the Active Directory Federation Services and browse to Trust Policy --> My Organization --> Account Stores and create a new Account Store.
2. In the wizard, choose for Active Directory Domain Services and make sure the account store is enabled
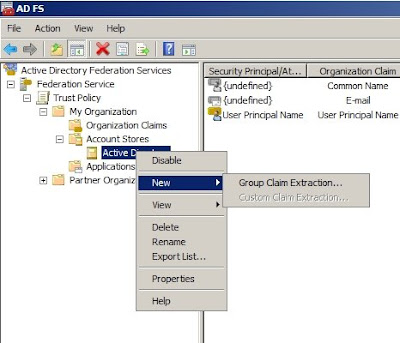
3. Now the Active Directory object has appeared, which we right click and choose to add a new Group Claim Extraction
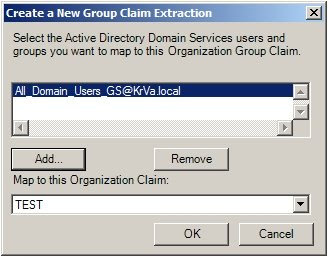
4. Enter the name of the security group to which you want to map the account store.
That's it, now we are going do the same for the resource domain. See my next (and last) post on this topic.
Federation Services setup posts:
1. Setting up Federation Services (FS) in a Windows 2008 (WS08) environment: Part 1: Overview and installation
2. Setting up Federation Services (FS) in a Windows 2008 (WS08) environment: Part 2: Configure IIS to use SSL on the FS servers
3. Setting up Federation Services (FS) in a Windows 2008 (WS08) environment: Part 3: Configure the FS certificates
5. Setting up Federation Services (FS) in a Windows 2008 (WS08) environment: Part 5: Configuring the FS server in the Resource domain
6. Setting up Federation Services (FS) in a Windows 2008 (WS08) environment: Part 6: Creating the federation trust on both sides
Now that we have our domains in order, our FS installed and our certificates out of the way, let's configure the Federation Services.
STEP 4: FS - Configuring the Federation Servers (Account domain)
To set up the Federarion Services in a domain, you need to perform three steps: trust policy, group claim & infamous account store configuration.
A) Trust policy configuration
1. Open the Active Directory Federation Services and open the Properties of the Trust Policy
2. In the Federation Service URI, type urn:federation:
3. In the Federation Service URL, type https://
4. Then add a name in the Display Name tab
B) Creating the group claim for the claims-aware application
1. Open the Active Directory Federation Services and browse to Trust Policy --> My Organization --> Organization Claims and create a new Organization Claim.
2. Enter a name and make sure the Group Claim is selected.
C) Creating the AD DS account store
1. Open the Active Directory Federation Services and browse to Trust Policy --> My Organization --> Account Stores and create a new Account Store.
2. In the wizard, choose for Active Directory Domain Services and make sure the account store is enabled
3. Now the Active Directory object has appeared, which we right click and choose to add a new Group Claim Extraction
4. Enter the name of the security group to which you want to map the account store.
That's it, now we are going do the same for the resource domain. See my next (and last) post on this topic.
Federation Services setup posts:
1. Setting up Federation Services (FS) in a Windows 2008 (WS08) environment: Part 1: Overview and installation
2. Setting up Federation Services (FS) in a Windows 2008 (WS08) environment: Part 2: Configure IIS to use SSL on the FS servers
3. Setting up Federation Services (FS) in a Windows 2008 (WS08) environment: Part 3: Configure the FS certificates
5. Setting up Federation Services (FS) in a Windows 2008 (WS08) environment: Part 5: Configuring the FS server in the Resource domain
6. Setting up Federation Services (FS) in a Windows 2008 (WS08) environment: Part 6: Creating the federation trust on both sides
Thursday, November 27, 2008
Setting up Federation Services (FS) in a Windows 2008 (WS08) environment: Part 3: Configure the FS certificates
In my last post, I explained how to configure your IIS to require SSL and how to install the needed FS Claims-aware agent.
Now, we need to configure our certificates.
STEP 3: FS - Creating, Exporting & Importing Certificates (Resource domain)
A) Creating the certificate (self-signed)
1. Open the IIS Manager and open the Server certificates on the server properties center panel
2. Here, under Actions click Create Self-signed certificate and give it a recognizable name.
B) Export the server authentication certificate to a file (Resource domain)
So that successful communication between the FS server and web server can occur, the web server must first trust the root of the FS server.
1. Open the IIS manager and double click on the Server Certificates
2. There select the FS server of the domain (here server3.test.local) and click Export.
3. Specify a certificate name and password, then click OK.
C) Import the certicate on the web server (Resource domain)
Now, the file that we created by exporting the certificate on the FS server can be imported on the web server.
1. Open a MMC window and add Certificates
2. Choose for Computer account -> Local computer and click Finish.
3. Go to the Trusted Root Certificate Authorities, right click and select Import under "All Tasks"
4. Browse to the certificate pfx file, created above and provide the password
5. On the Certificate Store page, click Place all certificates in the following store, and then click Next.
6. You should get a message: The import was successful after which you can see the certificate added in the mmc.
D) Export the token-signing certificate (Account domain)
The token-signing certificate will be used later to set up to Account Partner. For that, it will be imported to the Resource domain later on.
1. Open the Active Directory Federation Services and choose Properties on the Federation Service.
2. On the Details tab, click Copy to File.
3. In the wizard, on the Export Private Key choose No, do not export the private key
4. Then in the wizard, on the Export File Format, choose DER encoded binary X.509 (.CER)
5. Lastly, choose a file to export to and finish the wizard
There, that's it for this post. OK, it's quite a lot, but at least it very straightforward. It's the configuration of the FS were the magic is. That's for my next posts ...
Federation Services setup posts:
1. Setting up Federation Services (FS) in a Windows 2008 (WS08) environment: Part 1: Overview and installation
2. Setting up Federation Services (FS) in a Windows 2008 (WS08) environment: Part 2: Configure IIS to use SSL on the FS servers
4. Setting up Federation Services (FS) in a Windows 2008 (WS08) environment: Part 4: Configuring the FS server in the Account domain
5. Setting up Federation Services (FS) in a Windows 2008 (WS08) environment: Part 5: Configuring the FS server in the Resource domain
6. Setting up Federation Services (FS) in a Windows 2008 (WS08) environment: Part 6: Creating the federation trust on both sides
Now, we need to configure our certificates.
STEP 3: FS - Creating, Exporting & Importing Certificates (Resource domain)
A) Creating the certificate (self-signed)
1. Open the IIS Manager and open the Server certificates on the server properties center panel
2. Here, under Actions click Create Self-signed certificate and give it a recognizable name.
B) Export the server authentication certificate to a file (Resource domain)
So that successful communication between the FS server and web server can occur, the web server must first trust the root of the FS server.
1. Open the IIS manager and double click on the Server Certificates
2. There select the FS server of the domain (here server3.test.local) and click Export.
3. Specify a certificate name and password, then click OK.
C) Import the certicate on the web server (Resource domain)
Now, the file that we created by exporting the certificate on the FS server can be imported on the web server.
1. Open a MMC window and add Certificates
2. Choose for Computer account -> Local computer and click Finish.
3. Go to the Trusted Root Certificate Authorities, right click and select Import under "All Tasks"
4. Browse to the certificate pfx file, created above and provide the password
5. On the Certificate Store page, click Place all certificates in the following store, and then click Next.
6. You should get a message: The import was successful after which you can see the certificate added in the mmc.
D) Export the token-signing certificate (Account domain)
The token-signing certificate will be used later to set up to Account Partner. For that, it will be imported to the Resource domain later on.
1. Open the Active Directory Federation Services and choose Properties on the Federation Service.
2. On the Details tab, click Copy to File.
3. In the wizard, on the Export Private Key choose No, do not export the private key
4. Then in the wizard, on the Export File Format, choose DER encoded binary X.509 (.CER)
5. Lastly, choose a file to export to and finish the wizard
There, that's it for this post. OK, it's quite a lot, but at least it very straightforward. It's the configuration of the FS were the magic is. That's for my next posts ...
Federation Services setup posts:
1. Setting up Federation Services (FS) in a Windows 2008 (WS08) environment: Part 1: Overview and installation
2. Setting up Federation Services (FS) in a Windows 2008 (WS08) environment: Part 2: Configure IIS to use SSL on the FS servers
4. Setting up Federation Services (FS) in a Windows 2008 (WS08) environment: Part 4: Configuring the FS server in the Account domain
5. Setting up Federation Services (FS) in a Windows 2008 (WS08) environment: Part 5: Configuring the FS server in the Resource domain
6. Setting up Federation Services (FS) in a Windows 2008 (WS08) environment: Part 6: Creating the federation trust on both sides
Setting up Federation Services (FS) in a Windows 2008 (WS08) environment: Part 2: Configure IIS to use SSL on the FS servers
In my previous post, I explained my Federation Services setup and installed the FS roles on the servers in both domains.
Now, we'll configure IIS to use SSL on the FS servers.
STEP 2: FS - Configuring IIS on the webser (Resource domain)
A) Require SSL on both FS servers
1. on the web server open the IIS console
2. go to the Default Web Site and located the SSL settings.
3. choose Require SSL and for the client certificates choose Accept.
B) Certificate configuration of the IIS
1. open the IIS manager and browse to the Default Web Site.
2. Add a site binding in the Site Bingings action pane
3. Choose HTTPS as type and browse the certicate you created earlier for the FS
C) FS Web Agent
Next, we need to install the FS Web Agent, which makes you web server "claims aware"
1. open the Server Manager and add go to the Active Directory Federation Services role,
2. here click Add role Services and add the Claims-aware Agent. (if you have a seperate webserver (and for production I hope you do) you do the same but of course you go in via Add roles)
D) Creating a claims-aware application
Last in this post, we'll create a small default application as an example.
1. open the IIS manager and browse to the Default Web Site, right click it and choose Add Application.
2. choose an application name and select Classic .NET AppPool in the drop-down menu
3. point to the C:\Inetpub\wwwroot folder and create a seperate folder (do not use capitals for creating this folder)
4. Create the three files that make up the sample claims-aware application by using the procedures in Creating the Sample Claims-Aware Application.
That's it for this post, in the next post, we'll handle our certificates (creating, exporting and importing).
Federation Services setup posts:
1. Setting up Federation Services (FS) in a Windows 2008 (WS08) environment: Part 1: Overview and installation
3. Setting up Federation Services (FS) in a Windows 2008 (WS08) environment: Part 3: Configure the FS certificates
4. Setting up Federation Services (FS) in a Windows 2008 (WS08) environment: Part 4: Configuring the FS server in the Account domain
5. Setting up Federation Services (FS) in a Windows 2008 (WS08) environment: Part 5: Configuring the FS server in the Resource domain
6. Setting up Federation Services (FS) in a Windows 2008 (WS08) environment: Part 6: Creating the federation trust on both sides
Now, we'll configure IIS to use SSL on the FS servers.
STEP 2: FS - Configuring IIS on the webser (Resource domain)
A) Require SSL on both FS servers
1. on the web server open the IIS console
2. go to the Default Web Site and located the SSL settings.
3. choose Require SSL and for the client certificates choose Accept.
B) Certificate configuration of the IIS
1. open the IIS manager and browse to the Default Web Site.
2. Add a site binding in the Site Bingings action pane
3. Choose HTTPS as type and browse the certicate you created earlier for the FS
C) FS Web Agent
Next, we need to install the FS Web Agent, which makes you web server "claims aware"
1. open the Server Manager and add go to the Active Directory Federation Services role,
2. here click Add role Services and add the Claims-aware Agent. (if you have a seperate webserver (and for production I hope you do) you do the same but of course you go in via Add roles)
D) Creating a claims-aware application
Last in this post, we'll create a small default application as an example.
1. open the IIS manager and browse to the Default Web Site, right click it and choose Add Application.
2. choose an application name and select Classic .NET AppPool in the drop-down menu
3. point to the C:\Inetpub\wwwroot folder and create a seperate folder (do not use capitals for creating this folder)
4. Create the three files that make up the sample claims-aware application by using the procedures in Creating the Sample Claims-Aware Application.
That's it for this post, in the next post, we'll handle our certificates (creating, exporting and importing).
Federation Services setup posts:
1. Setting up Federation Services (FS) in a Windows 2008 (WS08) environment: Part 1: Overview and installation
3. Setting up Federation Services (FS) in a Windows 2008 (WS08) environment: Part 3: Configure the FS certificates
4. Setting up Federation Services (FS) in a Windows 2008 (WS08) environment: Part 4: Configuring the FS server in the Account domain
5. Setting up Federation Services (FS) in a Windows 2008 (WS08) environment: Part 5: Configuring the FS server in the Resource domain
6. Setting up Federation Services (FS) in a Windows 2008 (WS08) environment: Part 6: Creating the federation trust on both sides
Setting up Federation Services (FS) in a Windows 2008 (WS08) environment: Part 1: Overview and installation
OK. Let's take a look at the improved Federation Services of Windows Server 2008. OK, so it'll be a long look. But that's cool. This FS installation and configuration will be spread out over 6 posts.
But before we start, let we tell you my setup:
Account Domain:
Server2
AD DS - FS
192.168.46.1 /24
DNS: 192.168.46.1
krva.local
Resource Domain:
Server3
AD DS - FS - Webserver
192.168.51.1 /24
DNS: 192.168.51.1
test.local
Client PC:
XP
client in krva.local
192.168.46.101 /24
DNS: 192.168.46.1 / 192.168.51.1 (IMPORTANT)
Global Security Group: FedServ_GS
User Account: KrVa
created in krva.local
Of course, in a production environment, it's not quite the idea to install FS on your DC's, nor is installing the IIS on a DC ...
As for the rest, no trusts have been configured between the domains.
While you are installing your environment, a little bit more information about Federation Services:
1. AD FS provides a SSO (Single Sign On). It is an identity access solution that provides browser-based clients (internal or external to your network) with seamless, "one prompt" access to one or more protected Internet-facing applications, even when the user accounts and applications are located in completely different networks or organizations.
2. AD FS makes secondary accounts and their credentials unnecessary by providing trust relationships that you can use to project a user's digital identity and access rights to trusted partners.
3. AD FS makes a clear distinction between the Resource organization and the Account organization. The Resource organization owns and manages the resources that are accessible via the internet. The Account organization owns and manages the user accounts that FS links to security tokens that are used to authorize the users in the Resource organization.
OK, now that we have a basic understanding of Federation Services and you know my test setup. Let's do this thing.
STEP 1: FS - Installing the Federation Services (in both domains)
1. To do so, open the server manager and install the Active Directory Federation Services server role. If IIS is not yet installed on your server, it will automatically be installed.
2. You will need a certificate for SSL encryption. If you have a Certificate Authority (CA) you can use it to create a certficate. If not, choose to create a self-signed certificate during the FS installation. Of course, if you do this in a production setup, that is not the best option ...
3. For the token-signing (that's the security passport a user gets at login that is used to authenticate them in the "Resource domain"), we also create a self-signed token-signing certificate.
4. Lastly, we need to choose our trust policy. Since we don't have a trust policy yet, we will create a new one. So choose the path to which to safe you xml file (default option is C:\Windows\SystemData\adfs\trustpolicy.xml and there really isn't a reason to change that) so accept it and continue to the install section.
Next, we'll be configuring IIS to use SSL on both Federation Services Servers. Next out the next post.
Federation Services setup posts:
2. Setting up Federation Services (FS) in a Windows 2008 (WS08) environment: Part 2: Configure IIS to use SSL on the FS servers
3. Setting up Federation Services (FS) in a Windows 2008 (WS08) environment: Part 3: Configure the FS certificates
4. Setting up Federation Services (FS) in a Windows 2008 (WS08) environment: Part 4: Configuring the FS server in the Account domain
5. Setting up Federation Services (FS) in a Windows 2008 (WS08) environment: Part 5: Configuring the FS server in the Resource domain
6. Setting up Federation Services (FS) in a Windows 2008 (WS08) environment: Part 6: Creating the federation trust on both sides
But before we start, let we tell you my setup:
Account Domain:
Server2
AD DS - FS
192.168.46.1 /24
DNS: 192.168.46.1
krva.local
Resource Domain:
Server3
AD DS - FS - Webserver
192.168.51.1 /24
DNS: 192.168.51.1
test.local
Client PC:
XP
client in krva.local
192.168.46.101 /24
DNS: 192.168.46.1 / 192.168.51.1 (IMPORTANT)
Global Security Group: FedServ_GS
User Account: KrVa
created in krva.local
Of course, in a production environment, it's not quite the idea to install FS on your DC's, nor is installing the IIS on a DC ...
As for the rest, no trusts have been configured between the domains.
While you are installing your environment, a little bit more information about Federation Services:
1. AD FS provides a SSO (Single Sign On). It is an identity access solution that provides browser-based clients (internal or external to your network) with seamless, "one prompt" access to one or more protected Internet-facing applications, even when the user accounts and applications are located in completely different networks or organizations.
2. AD FS makes secondary accounts and their credentials unnecessary by providing trust relationships that you can use to project a user's digital identity and access rights to trusted partners.
3. AD FS makes a clear distinction between the Resource organization and the Account organization. The Resource organization owns and manages the resources that are accessible via the internet. The Account organization owns and manages the user accounts that FS links to security tokens that are used to authorize the users in the Resource organization.
OK, now that we have a basic understanding of Federation Services and you know my test setup. Let's do this thing.
STEP 1: FS - Installing the Federation Services (in both domains)
1. To do so, open the server manager and install the Active Directory Federation Services server role. If IIS is not yet installed on your server, it will automatically be installed.
2. You will need a certificate for SSL encryption. If you have a Certificate Authority (CA) you can use it to create a certficate. If not, choose to create a self-signed certificate during the FS installation. Of course, if you do this in a production setup, that is not the best option ...
3. For the token-signing (that's the security passport a user gets at login that is used to authenticate them in the "Resource domain"), we also create a self-signed token-signing certificate.
4. Lastly, we need to choose our trust policy. Since we don't have a trust policy yet, we will create a new one. So choose the path to which to safe you xml file (default option is C:\Windows\SystemData\adfs\trustpolicy.xml and there really isn't a reason to change that) so accept it and continue to the install section.
Next, we'll be configuring IIS to use SSL on both Federation Services Servers. Next out the next post.
Federation Services setup posts:
2. Setting up Federation Services (FS) in a Windows 2008 (WS08) environment: Part 2: Configure IIS to use SSL on the FS servers
3. Setting up Federation Services (FS) in a Windows 2008 (WS08) environment: Part 3: Configure the FS certificates
4. Setting up Federation Services (FS) in a Windows 2008 (WS08) environment: Part 4: Configuring the FS server in the Account domain
5. Setting up Federation Services (FS) in a Windows 2008 (WS08) environment: Part 5: Configuring the FS server in the Resource domain
6. Setting up Federation Services (FS) in a Windows 2008 (WS08) environment: Part 6: Creating the federation trust on both sides
Sunday, November 16, 2008
Staged installation of a Read-Only Domain Controller (RODC)
RODC's, one of the new functions in a Windows 2008 AD. I'm sure you know by know what it is and how it can serve you. The easiest way to deploy a RODC is via the typical installation, or Direct Installation as Microsoft calls it, with a simple dcpromo - next - next - finish.
However, you can have a regular user install a RODC in a branch office wihtout giving him extra permissions. That's done with using the the Staged Installation where a regular domain user without privileged permissions will perform the last stages of the RODC deployment.
First, we'll have to prep our AD for the upcoming RODC deployment. Of course, this section is done on a Domain Controller and therefor needs to be performed by a domain administrator. Needless to say, this is the bulk of the work.
A) Preparing the AD for the RODC account
1. Open the Active Directory Users and Computers console, right click the Domain Controllers OU and choose for Pre-create Read-Only Domain Controller Account.
2. Decide wether or not you want to use Advanced Mode.Since I don't want to change the default Password Replication Policy (PRP) I'm not choosing for advanced mode.
3. Choose the credentials that you want to use to perform the RODC account creation (as said before, this account needs to be member of the Domain Admins group)
4. Choose a name for the RODC (this name will have to be given to the server computer)
5. Choose a site in which the RODC will be deployed
6. Select if you want the RODC to also be a DNS and/or Global Catalog
7. Now you can select which user (or group) that can attach the server to the RODC account (this account will need local admin permissions)
8. Last is the Summary Page which you can use to Export your settings to an answer file for future RODC account creations.
9. If all goes well, the wizard closes succesfully and your Unoccupied DC Account will be visible in AD.
OK, our AD is now prepared for the new RODC. Let’s log on to the server and install it as a RODC using a regular user account. Make sure the server is NOT part of domain while doing the upgrade to RODC.
B) Attach the server to the RODC account
1. Log on the server as the local administrator
2. Launch the command dcpromo /UseExistingAccount:Attach.
3. On the Welcome Page, choose for Advanced Mode.
4. Specify the forest to which the RODC is being added and provide the account that has been delegated permissions to add the RODC.
5. If you have configured everything correctly, the wizard will find the Unoccupied RODC account
6. Choose how you want to replicate data from the existing DC’s (via the network or via Media)
7. If you choose to replicate from the DC’s, you can now choose which DC
8. The last steps are the same as a normal installation: choose the NTDS and SYSVOL location and restore password.
9. On the Review Page you can verify your selctions and export them to an answer file for future installations.
10. As the last page of wizard explains, the configuration can last from several hours to several hours.
The Active Directory Services are now being installed and after a reboot you’re done! Pretty slick, this new staged installation of the RODC.
Tuesday, November 11, 2008
Configuring Fine-Grained Password Policies: Managing a PSO (Password Security Object)
In my previous post I've shown how we can create a PSO for a fine-grained password policy with an ldf script. In this post, I quickly go over the most common performed configuration changes.
2: Apply the PSO to Users and Global Security Groups
Now, in my example, I’ve added the PSO to a security group “All_domain_Users_GS”. However, I can add multiple users or groups to this PSO with a simple modify of the existing PSO.
Create a new ldf file and copy this text:
dn: CN=Kristof_PSO,CN=Password Settings Container,CN=System,DC=KrVa,DC=local
changetype: modify
add: msDS-PSOAppliesTo
msDS-PSOAppliesTo:CN=Kristof Vanweert,OU=Users,DC=KrVa,DC=Local
-
(Don't forget the dash "-" on the last line of the script, or it won't work!)
Then run your script again with the same command.
If all is OK, you’ll wind up with something like this:
Step 3: Managing the PSO
Now that the PSO is created, we can manage it from within the Users and Computers console.
Make sure you have the “Advanced features” enabled and browse to System -> Password Settings Container. Double click on your PSO and select the tab Attribute Editor. In this screen, you can edit all values as desired.
In this print screen you can see that the PSO precedence value is 10. If a user has multiple PSO assigned, the lowest value PSO will “win”.
Step 4: Managing Users
Now, that our PSO is completely in place, luckily it is pretty easy to figure out which PSO’s are applied on which user account.
To do so, open the Users and Computers console, enable the “Advanced Features”, locate your user account and open the “Properties”. Go to the “Attribute Editor” tab and adjust the filters to show Constructed Read-Only Attributes after which you can locate the msDS-ResultantPSO attribute.
There, nothing more to it. Luckily they didn’t make it more difficult than just creating a GPO and linking it to an OU …
Configuring Fine-Grained Password Policies: Creating a PSO (Password Security Object)
Finally! Since WS08 we are able to create separate password policies for different users within the same domain. As you can remember, in all previous versions, the password policy needed to be configured on domain level. Effectively forcing you to create a new domain if password policies needed to vary.
Unfortunately, in WS08 it is not just a case of configuring a GPO and linking it to an OU. There are several steps involved. Which I will go over in detail in this and the next post.
But before we start: the domain functional level needs to be set to Windows Server 2008, you need to have domain admin permissions and the fine-grained password policy can only be applied to users or global security groups.
1: Creating a PSO (Password Security Object)
You can create the PSO using the ADSIEDIT tool or via a ldifde script (which is what I used in this post).
Open a notepad and safe the file with .ldf extension. Then copy the next section and adjust as you prefer.
dn: CN=Kristof_PSO,CN=Password Settings Container,CN=System,DC=KrVa,DC=Local
changetype: add
objectClass: msDS-PasswordSettings
msDS-MaximumPasswordAge:-1728000000000 (FYI: 42 days DO NOT ADD THIS)
msDS-MinimumPasswordAge:-864000000000 (FYI: 1 day DO NOT ADD THIS)
msDS-MinimumPasswordLength:8
msDS-PasswordHistoryLength:24
msDS-PasswordComplexityEnabled:TRUE
msDS-PasswordReversibleEncryptionEnabled:FALSE
msDS-LockoutObservationWindow:-18000000000 (FYI: 30 minutes DO NOT ADD THIS)
msDS-LockoutDuration:-18000000000 (FYI: 30 minutes DO NOT ADD THIS)
msDS-LockoutThreshold:0
msDS-PasswordSettingsPrecedence:10
msDS-PSOAppliesTo:CN=All_Domain_Users_GS,OU=Groups,DC=KrVa,DC=Local
Values are entered in I8 format:
• For minutes, multiple your value with 600000000
• For Hours, multiple your value with 36000000000
• For Days, multiple your value with 864000000000
Then run your script in a command screen: ldifde –i –f Kristof_PSO.ldf
If you have configured your script correctly, you will get an output that looks a little like this:
Basically, your password policy is now in place. In the next post, I will go over some maintenance and extra configuration options.
Enjoy!
Subscribe to:
Posts (Atom)