Thursday, February 07, 2008

Exchange 2007: adjust the default message size limits

Already noticed that in Exchange 2007 you cannot change the default message size limits anymore in the traditional Exchange management console?
In het Hub Transport of the Organization Configuration under Send Connectors we can see the various send connectors we have. But it is not possible to change the message limits here.

Of course, we can still change the message size limits on a "per user" basis under Recipient configuration - Mailbox.

Seems pretty excessive for thousands of mailboxes, no?
Of course, you can still change the default settings, but now it has to be done via the Exchange Management Shell.

First we can check how much the message size limit is at the moment with the command:
get-sendconnector | select identity,maxmessagesize.

Now we can change this to for example 20 MB by executing this command:
set-sendconnector "Connector Name" -maxmessagesize 20MB

Run the first command again to check if it worked:


O yeah, restart the Information store service and voila ... :)

Monday, February 04, 2008

Warning MSExchangeTransport, Event 15002, on Exchange 2007

So last week Friday I noticed in the afternoon I hadn't received a single e-mail today. I open the Exchange Management console and don't see anything wrong at first glance. The event viewer contains however a few warnings: eventID 15002

I think: "OK, a warning, I'll look at that later ..." and open a command screen to telnet the SMTP port of our Exchange 2007 hub transport server. I immediately get the error: 452 4.3.1 Insufficient system resources back.

Hhhmmmm ... insufficient system resources ... resource pressure constantly high ... Hey, those things belong together ...

So I do some research on Technet and start reading into this a little bit. Appearently this is a feature, not a bug ... and it's called back pressure.

What can we do?
Well it's obvious that the best way to go is adding the resource you are short off. In my case: disk space. The limit is 4 GB and I had only 3,8 GB left on my partition.

Now, if you don't have that option, there is a page on Technet that specifies which keys can be changed in the EdgeTransport.exe.config file (XML based) that you can find under C:\Program Files\Microsoft\Exchange Server\Bin.
For every resource that monitored a key is present that can be adjusted. Of course, Microsoft does not recommend this and warns that adjusting the config file can lead to poor performance and data loss.

Still, I think this is a good new feature, but it should be more visible, not just a warning in the event viewer

Deploying Sysprep on VirtualCenter 2.0

Everyone who has followed the VMware Infrastructure 3 four day course will know how to install Sysprep on your VirtualCenter so you are able customize new VM's during their deployment. But for people who are just playing around with it still, not having followed the course or people that have to dig really deep in their memory (like me) in order to come up with it again, I've created this small post. (their doesn't seem to be lots of info on this on-line ...)

Sysprep is not installed and distributed by VMware for a good reason. Sysprep is free for end-users like ourselves, but not if you want to distribute it ...
So instead of having you pay VMware for Microsoft technology, they just tell you download and install it yourself.

The steps are fairly simple, but the path to which to copy the files are mostly the problem:
1. Download the Sysprep Update Version 1.1 (Q257813_W2K_spl_X86_EN.exe) from Microsoft at this link (if they haven't changed it again).
Info: Validation will be required.

2. Extract the package and copy the files to the directory C:\\Application Data\Vmware\VMware
VirtualCenter\sysprep\1.1
. The result should look like this:

3. Download the Windows Server 2003 Service Pack 1 32-bit Deployment Tools (WindowsServer2003-KB892778-SP1-DeployTools-x86-ENU.cab) from Microsoft at this link (if they haven't changed it again).

4. Extract the package and copy the files to the directory C:\\Application Data\Vmware\VMware
VirtualCenter\sysprep\Svr2003
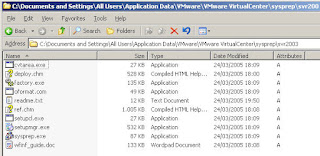
. The result should look like this:

Now, we can use the Customize using the Customization wizard option at the template after which you can specify all the desired settings.


Of course, easier still, is sysprepping the VM you want to convert to a template prior to doing so. If an unattend setup is specified, the VM's that are deployed from this template will automatically have all the correct settings, specified in the unattend file.
How to sysprep a machine is not included here since there are hundreds of step-by-step guides of this on-line.

Have fun!