I've been working a few months ago on a AD design for a customer of the company I work for. The AD was not huge, but it was more than just a little 1 forest, 1 tree, 1 domain Active Directory. In the end, the short summary is a single forest, with a empty root domain and 2 child domains.
Of course, for this, lots of documentation need to be read (and created), lots of collaboration, meetings, ... You know, the usual stuff.
I have now created a summary of Best Practices of various documents I've read, which I think make up the ultimate "Best Practice" for AD Design.
These are just copy pastes of various, publicly available documents, so I'm not trying to take any credit for these great "Best Practices".
Forest Design Best Practices
The forest design process includes the following best practices:
• Identify the number of forests and write a justification for each one.
• Identify the number of trees and write a justification for each one.
• Wherever possible, create a Protected Forest Root Domain.
• Wherever possible, create a Single Global Child Domain for production in each tree.
• Identify the number of additional domains required in each tree.
• Identify the scope and contents of each domain.
• Justify each domain.
• Choose the generic name for each domain.
• Once the domain structure for the production forest is complete, design the domain structure for the other forests you created.
Naming Best Practices
Use the following best practices to name your AD forests:
• Use standard Internet characters. If they work on the Internet, they will definitely work in your network. Avoid accents and solely numeric names.
• Use 15 characters or less for each name.
• For the root name, use a simple, short name that is representative of the identity of the organization.
• Follow all DNS standards and make sure the internal DNS name is different from your
external name.
• Finally, before proceeding, buy the name.
Production OU Design Best Practices
Keep the following rules in mind when you create OU structures:
• Think in terms of equipment and objects in the directory.
• Determine how you will implement the administrative delegation process.
• Identify standards for all administrative categories in the organization.
• Use the administrative service or function or the line of business to name OUs. These tend to be more stable than organizational structure.
• Limit your structure to five levels, three if you are not responsible for the finalization of the structure. Recommend a maximum of five levels even though ten are possible. This gives you some breathing room.
• Remember the four reasons for the creation of OUs: categorization, administration, delegation, and segregation.
• Each OU you create must add value to the system.
• Never create an OU that does not contain any objects.
• Never create an OU that does not have a specific purpose.
• If an OU reaches an empty state, consider removing it. This may not be necessary because it may only be temporarily empty. If not, remove it.
• Identify an OU owner for each one you create. If no owner can be identified, remove the OU
• Justify all OUs you create.
• If you find that two OUs have the same purpose, merge them. This means that the combination of owner plus GPO plus delegation strategy is the same for both OUs.
• Use default OUs to administer the whole domain. Domain controllers should be kept in the DC OU. Domain Administrator accounts and groups should be kept in the Users OU. Domain Administrator PCs should be kept in the Computers OU.
• Use the production domain OU strategy to define the OU strategy for other domains and forests.
• Don’t forget to define and put in place standards for the recurring creation and deletion of OUs. These will help control the proliferation of OUs in your directory.
AD Integration Best Practices
Use the following best practices during this process:
• Active Directory should be the core directory service. AD can be modified through a graphical interface. You can also use scripts to perform massive modifications with AD. AD also supports a powerful delegation model. Finally, it supports PC management, something few directory services can perform.
• Use AD as your single point of interaction. AD provides a single point of interaction because it is a distributed database that uses a multimaster replication process. Users can modify data in any regional office and it will automatically be updated through the directory.
• If you need to maintain data integrity between multiple directories, use Microsoft
MetaDirectory Services with Active Directory as your primary data source.
• If you need to install NOS-related applications that modify the schema, add them to the forest root domain before creating the child domains.
• If you need to integrate in-house applications to the directory, use AD in Application Mode. This will have no impact on your NOS directory.
• Integrate NOS-related and other applications to AD only if it is absolutely required. Schema modifications can be retired and reused, but only through a complex process that will involve replication throughout your distributed NOS directory.
• Maintain your Active Directory as a NOS directory first and foremost. This will limit the amount of replication in the forest and will make it easier to upgrade to future versions of Windows server operating systems.
Service Positioning Best Practices
Use the following rules to design your Service Positioning scenario:
• In large AD structures, place the forest-wide Operation Masters in a Protect Forest Root Domain.
• If your forest spans multiple sites, place the Schema Master in one site and the Domain Naming Master in another.
• Carefully protect the access to the Schema Master role.
• Place the RID Master and the PDC Emulator roles on the same DC.
• Create a dedicated PDC Emulator role in domains that have more than 50,000 users.
• Separate Global Catalogs and Infrastructure Masters if you can.
• Place at least two domain controllers per domain.
• If a small domain spans two sites, use at least two domain controllers, one for each site.
• Place a Global Catalog server in each geographic site that contains at least one domain controller.
• Enable Universal group membership caching in each geographic site.
• Place a domain controller wherever there are more than ten users unless the WAN link speed will adequately support remote logon attempts
• Add a regional domain controller whenever there are more than 50 users per DC, especially if it is a multipurpose server.
• Install the Domain Naming Service on every domain controller.
• Use application partitions to designate DNS replication scopes.
Best Practices for Site Topology Design
Use the following best practices to design your site topology:
• Use the default configuration for inter-site replication.
• Do not disable the Knowledge Consistency Checker.
• Do not disable transitive trusts.
• Do not specify Bridgehead Servers.
• Calculate replication latency between sites.
• Create sites according to network topology; Site Links and WAN links should correspond.
• Make sure that no single site is connected to more than 20 other sites.
• Each site must host at least one DC.
• Do not use SMTP for domain-centric replication.
• Do not use SMTP replication if at all possible.
• Use 128 Kbps as the minimum WAN circuit for a Site Link.
• Associate every site with at least one subnet and one Site Link, otherwise it will be unusable.
• Create backup Site Links for each site. Assign higher costs to backup Site Links.
• Create Site Link Bridges wherever there are two hops between sites to reduce replication latency.
• If your available network bandwidth can afford it, ignore replication schedules in all sites. Replication will be performed when required with this option, but it will be more demanding on WAN bandwidth.
• Enable Universal Group Membership Caching in all sites.
• Use Preferred Bridgehead Servers only if replication must cross a firewall.
• Size your DCs accordingly.
• Monitor replication once your forest is in place to determine the impact on your WAN links.
Schema Modification Strategy Best Practices
Use the following schema modification best practices:
• Don’t make your own modifications to the schema unless they are absolutely necessary.
• Use AD primarily as a NOS directory.
• Use AD/AM to integrate applications.
• Use MMS 2003, Standard Edition to synchronize AD and AD/AM directories.
• Make sure all commercial products that will modify the schema are Windows Server 2003 Logo approved.
• Limit your initial modifications to modifications by commercial software.
• Create a Schema Change Policy Holder role early in the AD Implementation Process.
• Document the Schema Modification Policy and Process.
Enjoy!
Wednesday, April 16, 2008


Wednesday, April 09, 2008
Message hygiene in Exchange 2003 & Exchange 2007
Message hygiene is nothing more than a fancy expression that Microsoft uses when they mean techniques to defend your Exchange environment against spam, virusses and other e-mail attacks.
Below is a short overview of the various components that are natively available to you for the job of hardening your Exchange 2003 system:
Filtering:
- Connection filtering: Filters inbound messages by comparing their IP address against a block list provided by a third-party real-time block list service. You can also enter your own set of accepted/restricted IP addresses at a global level.
- Sender filtering: By default, SMTP connections that are created by senders on this list are dropped.
- Recipient filtering: Allows you to set global restrictions on mail to specific recipients.
These filtering options can be specified under the Global Settings of your Exchange Organization and choose for Message Delivery.
Restricted Distribution Lists
As you are aware, there are probably DL's in your organization that hold all contacts or at least divided per department.
By default, all users can use these DL's to send e-mails to. That's not just dangerous from an internal user point of view (a typing/clicking mistake is quickly made), but of course, hackers love this even more ...
You can restrict access to these DL's based on userID's. To do this, open the AD Users & Computers snap-in, browse to the DL and on the properties specify the "message Restrictions".

Intelligent Message Filtering (IMF)
Based on the characteristics of millions of messages, Intelligent Message Filter can accurately assess the probability that an incoming e-mail message is either a legitimate message or UCE(Unsolicited Commercial Email).
Based on the probability that the message is UCE, IMF rates it with a property called a spam confidence level (SCL).
You can specify 2 thresholds, the gateway threshold and the mailbox threshold, on the SCL that determine what is done with the incoming e-mail. If the e-mail has a rating equal or greater than the gateway threshold, your specified action is taken.
If the rating is lower than the mailbox threshold, the mail is delivered, if the rating is greater it is delivered to the junk inbox.

Anti-virus
In Exchange 2003 there is not a built-in protection against virusses, but there is a anti-virus framework that is used by third-party companies, such as McAfee, TrendMicro, Kaspersky, ...
Address Spoofing Protection
By default, Exchange 2003 preserves the original SMTP message submission method and does not resolve the sender's address if the SMTP submission is anonymous. If the original message was submitted without authentication, Exchange 2003 marks the message as un-authenticated and, in this case, the sender's address is not resolved to the GAL display name (in the From line), instead it is displayed to the recipient in its SMTP format (for example, whatever@duh.euh).
Another mechanism you can use is to configure your SMTP virtual server to perform a reverse DNS lookup on incoming e-mail messages, verifying that the IP address and fully qualified domain name (FQDN) of the sender's mail server corresponds to the domain name listed in the message.
However, consider the following limitations to reverse DNS lookups:
- The sender's IP address may not be in the reverse DNS lookup record, or the sending server may have multiple names for the same IP, not all of which may be available from the reverse DNS lookup record.
- Reverse DNS lookups place an additional load on the Exchange server.
- Reverse DNS lookups require that the Exchange server is able to contact the reverse lookup zones for the sending domain.
- Performing reverse DNS lookups on each message can result in a substantial decrease in performance due to increased latency.
Tar pitting
SMTP tar pitting is the practice of artificially delaying server responses for certain SMTP communication patterns and it's used to help fight spam attacks, such as Directory Harvest Attack (DHA).
If a hacker guesses all the possible recipients in a domain, he will receive a bunch of "550 User unknown" messages to the non-existing addresses. So the other addresses are valid. A DHA attack with 4 caracters can be done in 20 minutes, if you delay the SMTP replies with 5 seconds, it will take several months!
With Exchange 2007, these roles have been moved to an "Edge Transport Server". This Exchange 2007 server role can not be combined with other roles and should be done on a server that is not part of your domain and resides in your DMZ. It's obvious this way of doing things is still much better since spam and virusses won't be entering your network at any point.

This in combination with the Forefront security for Exchange 2007 for anti-virus and anti-spam, your users will complain a lot less about spam and you will have to worry less about virusses entering your network.
Of course, the threat will always stay, hackers find always find a way ...
Below is a short overview of the various components that are natively available to you for the job of hardening your Exchange 2003 system:
Filtering:
- Connection filtering: Filters inbound messages by comparing their IP address against a block list provided by a third-party real-time block list service. You can also enter your own set of accepted/restricted IP addresses at a global level.
- Sender filtering: By default, SMTP connections that are created by senders on this list are dropped.
- Recipient filtering: Allows you to set global restrictions on mail to specific recipients.
These filtering options can be specified under the Global Settings of your Exchange Organization and choose for Message Delivery.
Restricted Distribution Lists
As you are aware, there are probably DL's in your organization that hold all contacts or at least divided per department.
By default, all users can use these DL's to send e-mails to. That's not just dangerous from an internal user point of view (a typing/clicking mistake is quickly made), but of course, hackers love this even more ...
You can restrict access to these DL's based on userID's. To do this, open the AD Users & Computers snap-in, browse to the DL and on the properties specify the "message Restrictions".

Intelligent Message Filtering (IMF)
Based on the characteristics of millions of messages, Intelligent Message Filter can accurately assess the probability that an incoming e-mail message is either a legitimate message or UCE(Unsolicited Commercial Email).
Based on the probability that the message is UCE, IMF rates it with a property called a spam confidence level (SCL).
You can specify 2 thresholds, the gateway threshold and the mailbox threshold, on the SCL that determine what is done with the incoming e-mail. If the e-mail has a rating equal or greater than the gateway threshold, your specified action is taken.
If the rating is lower than the mailbox threshold, the mail is delivered, if the rating is greater it is delivered to the junk inbox.

Anti-virus
In Exchange 2003 there is not a built-in protection against virusses, but there is a anti-virus framework that is used by third-party companies, such as McAfee, TrendMicro, Kaspersky, ...
Address Spoofing Protection
By default, Exchange 2003 preserves the original SMTP message submission method and does not resolve the sender's address if the SMTP submission is anonymous. If the original message was submitted without authentication, Exchange 2003 marks the message as un-authenticated and, in this case, the sender's address is not resolved to the GAL display name (in the From line), instead it is displayed to the recipient in its SMTP format (for example, whatever@duh.euh).
Another mechanism you can use is to configure your SMTP virtual server to perform a reverse DNS lookup on incoming e-mail messages, verifying that the IP address and fully qualified domain name (FQDN) of the sender's mail server corresponds to the domain name listed in the message.
However, consider the following limitations to reverse DNS lookups:
- The sender's IP address may not be in the reverse DNS lookup record, or the sending server may have multiple names for the same IP, not all of which may be available from the reverse DNS lookup record.
- Reverse DNS lookups place an additional load on the Exchange server.
- Reverse DNS lookups require that the Exchange server is able to contact the reverse lookup zones for the sending domain.
- Performing reverse DNS lookups on each message can result in a substantial decrease in performance due to increased latency.
Tar pitting
SMTP tar pitting is the practice of artificially delaying server responses for certain SMTP communication patterns and it's used to help fight spam attacks, such as Directory Harvest Attack (DHA).
If a hacker guesses all the possible recipients in a domain, he will receive a bunch of "550 User unknown" messages to the non-existing addresses. So the other addresses are valid. A DHA attack with 4 caracters can be done in 20 minutes, if you delay the SMTP replies with 5 seconds, it will take several months!
With Exchange 2007, these roles have been moved to an "Edge Transport Server". This Exchange 2007 server role can not be combined with other roles and should be done on a server that is not part of your domain and resides in your DMZ. It's obvious this way of doing things is still much better since spam and virusses won't be entering your network at any point.

This in combination with the Forefront security for Exchange 2007 for anti-virus and anti-spam, your users will complain a lot less about spam and you will have to worry less about virusses entering your network.
Of course, the threat will always stay, hackers find always find a way ...
Thursday, April 03, 2008
MSExchange System Attendant Mailbox: Error 4001: Exchange 2007 on DC with GC
At home, in my test environment I've installed an Exchange 2007 on a Domain Controller that is also a Global Catalog. A little preparation made sure of an easy installation, but everytime I restarted my Domain Controller, Exchange services would not come up correctly and error events were logged in my Application eventlog.
More specifically:MSExchange System Attendant Mailbox EventID 4001

A bunch of information that still gives every vage inside.
With a little searching online I found this Microsoft article.
The cause for these errors is located in the fact that several Exchange server dependent services are still starting when Exchange 2007 tries to start.
You can keep starting the services manually or add some registry keys to delay the startup a specific number of seconds as described in the article.
More specifically:MSExchange System Attendant Mailbox EventID 4001

A bunch of information that still gives every vage inside.
With a little searching online I found this Microsoft article.
The cause for these errors is located in the fact that several Exchange server dependent services are still starting when Exchange 2007 tries to start.
You can keep starting the services manually or add some registry keys to delay the startup a specific number of seconds as described in the article.
Thursday, March 27, 2008
Vista SP1 Cleanup tool
For those of you that are running Vista, but haven't deployed SP1 yet: do it!
Sure, the installation will take you 2 hours, not including the download, but the performance gain is considerable.
If you still have to install SP1, make sure you comply to the prerequisites before continuing with the installation of SP1. For laptops: make sure the AC power is plugged-in and don't remove it during the installation of SP1. If the laptop can't restart successfully during the No boot window you are f***ed ... During this fase, the critical drivers and components are updated.
For more information, check this guide: Windows Vista Service Pack 1 Deployment Guide
OK, now that your SP1 is installed, the PC perfoms a lot better, but as you noticed, your hard disk has less free space available.
Now with the Vista SP1 cleanup tool you can reclaim about 2 GB. The VSP1CLN.exe tool will remove Vista RTM files that have been superseded by SP1 files. And it will also remove backups, which means that uninstalling the SP1 is no longer an option! (not that you will want to do that)
Where can I download this tool? You can't, if you have SP1 installed, you have the cleanup tool as well ... It is located in the %windir%\system32 folder so you can directly run it in a command screen:

The uninstallation can take some time. With me about 10 - 15 minutes, but afterwards no further action is required:

Enjoy!
Sure, the installation will take you 2 hours, not including the download, but the performance gain is considerable.
If you still have to install SP1, make sure you comply to the prerequisites before continuing with the installation of SP1. For laptops: make sure the AC power is plugged-in and don't remove it during the installation of SP1. If the laptop can't restart successfully during the No boot window you are f***ed ... During this fase, the critical drivers and components are updated.
For more information, check this guide: Windows Vista Service Pack 1 Deployment Guide
OK, now that your SP1 is installed, the PC perfoms a lot better, but as you noticed, your hard disk has less free space available.
Now with the Vista SP1 cleanup tool you can reclaim about 2 GB. The VSP1CLN.exe tool will remove Vista RTM files that have been superseded by SP1 files. And it will also remove backups, which means that uninstalling the SP1 is no longer an option! (not that you will want to do that)
Where can I download this tool? You can't, if you have SP1 installed, you have the cleanup tool as well ... It is located in the %windir%\system32 folder so you can directly run it in a command screen:

The uninstallation can take some time. With me about 10 - 15 minutes, but afterwards no further action is required:

Enjoy!
Windows 2008 Core (WS08 Core): Core Configurator
When the first versions of Windows 2008 Core came out, I've posted some articles on how you can create user accounts, promote the server to a DC, change screen resolution, ... on the Core server itself.
Once your WS08 Core is setup, you can administer it remotely, as I'm sure you will all already know.
But now, a freeware tool has been created by Guy Teverovsky, a MVP. With this tool, you have a basic GUI that can:
- Change computer name
- Change and configure IP address, subnet mask, default gateway, DNS address
- Change firewall settings
- Join a domain
- Configure remote desktop
- Add or remove roles and features
- Upgrade the server to be a Domain Controller
- Change system time, regional settings
- Configure the paging file
- Activate the server or enter the product ID
- ...
Just download the tool from his blog: CoreConfigurator, install the msi on your WS08 Core server and run the CoreConfigurator.exe file.

The rest after that is point & click. Very cool!
Once your WS08 Core is setup, you can administer it remotely, as I'm sure you will all already know.
But now, a freeware tool has been created by Guy Teverovsky, a MVP. With this tool, you have a basic GUI that can:
- Change computer name
- Change and configure IP address, subnet mask, default gateway, DNS address
- Change firewall settings
- Join a domain
- Configure remote desktop
- Add or remove roles and features
- Upgrade the server to be a Domain Controller
- Change system time, regional settings
- Configure the paging file
- Activate the server or enter the product ID
- ...
Just download the tool from his blog: CoreConfigurator, install the msi on your WS08 Core server and run the CoreConfigurator.exe file.

The rest after that is point & click. Very cool!
Monday, March 03, 2008
VMworld Europe in Cannes: day 2
On the second day, the keynotes were presented by Doctor Mendel Rosenblum from VMware.
 Together with the Break-out sessions, a few more interesting features were mentioned:
1. VCB enhancements
As you already know, VCB had to be run on a physical W2K3 server and have a HBA adapter to access the SAN storage in order for it to function. Now, VCB can be run on a VM and access not only SAN storage, but also iSCSI, NAS and local storage!
2. Platform enhancements
The VM's running on ESX hosts can be made aware that they are virtual machines and that the hardware they see it actually not really there. This gives as benifits that calls to the memory and processor can be encapsulated differently, resulting in better performance.
3. VMsafe
One of the biggest points on the second day. VMsafe is the new technology that will keep virtual systems more secure than physical systems. It will use host- and network based protection that cannot be compromised by malware (literally the best of both worlds). With this technology it is actually possible to have secure Vm's while your physical server is compromised.
Also very cool is that VMware does not try to do everything themselves, but provides API's that the security vendors can use to build their products on.
McAfee will ship its first VMsafe enabled products within 2 months!
4. SRM: Site Recovery Manager
This feature is very cool! When an entire datacenter goes down, a second, stand-by datacenter can be configured that will automatically restart the VM's with all it's functionalities. For this to work, you will have to have a backup environment of course, together with the required licenses, but hey: what's the price for a day of downtime? ;)
When SRM is configured, the VM's are automatically duplicated in the backup site but without HD's. In case of a disaster, the files on the datastores are unlocked and moved to the backup site. The HD is connected to the already existing VM and the VM is powered on. All within 10 - 15 minutes!
5. Vservices
Last new features I noticed while I was over there. But very cool none the less. vServices contain multiple VM's that work together, for example CRM, Sharepoint, ... Idea is that a specialist in that matter can create a complete package that you only have to download and drop it in your environment. During the demo from Dr. Rosenblum CRM was installed under a minute that way! :)
That's about it for me, I guess. And how about the last day? Well, those were troubleshooting sessions, labs or technical deep dives. I'll try to post some of the most interesting points, when I find the time.
 Together with the Break-out sessions, a few more interesting features were mentioned:
1. VCB enhancements
As you already know, VCB had to be run on a physical W2K3 server and have a HBA adapter to access the SAN storage in order for it to function. Now, VCB can be run on a VM and access not only SAN storage, but also iSCSI, NAS and local storage!
2. Platform enhancements
The VM's running on ESX hosts can be made aware that they are virtual machines and that the hardware they see it actually not really there. This gives as benifits that calls to the memory and processor can be encapsulated differently, resulting in better performance.
3. VMsafe
One of the biggest points on the second day. VMsafe is the new technology that will keep virtual systems more secure than physical systems. It will use host- and network based protection that cannot be compromised by malware (literally the best of both worlds). With this technology it is actually possible to have secure Vm's while your physical server is compromised.
Also very cool is that VMware does not try to do everything themselves, but provides API's that the security vendors can use to build their products on.
McAfee will ship its first VMsafe enabled products within 2 months!
4. SRM: Site Recovery Manager
This feature is very cool! When an entire datacenter goes down, a second, stand-by datacenter can be configured that will automatically restart the VM's with all it's functionalities. For this to work, you will have to have a backup environment of course, together with the required licenses, but hey: what's the price for a day of downtime? ;)
When SRM is configured, the VM's are automatically duplicated in the backup site but without HD's. In case of a disaster, the files on the datastores are unlocked and moved to the backup site. The HD is connected to the already existing VM and the VM is powered on. All within 10 - 15 minutes!
5. Vservices
Last new features I noticed while I was over there. But very cool none the less. vServices contain multiple VM's that work together, for example CRM, Sharepoint, ... Idea is that a specialist in that matter can create a complete package that you only have to download and drop it in your environment. During the demo from Dr. Rosenblum CRM was installed under a minute that way! :)
That's about it for me, I guess. And how about the last day? Well, those were troubleshooting sessions, labs or technical deep dives. I'll try to post some of the most interesting points, when I find the time.
VMworld Europe in Cannes: day 1
Last week I had the priviledge of going to VMworld in beautiful Cannes.

 Lots of interesting new features were introduced in the new VI 3.5 or are going to be implemented in future updates.
I've created a short overview of the most important new features I noticed at VMworld at Day 1:
1. ESX server 3i
Several types of Siemens, HP and Dell servers are going to be shipped with ESX 3i. With this, ESX is already installed and during the first power up of the server a few configuration options have to be chosen and your new ESX server is automatically added to your existing ESX environment. So basically, extra CPU power and Memory can be added to your cluster within minutes.
In ESX 3i, no Service console is included anymore and only a 32 MB hypervisor. For command line instructions, a remote console can be downloaded.
2. Update Manager
The Update Manager can patch your ESX servers as well as your Windows and Linux VM's, even if those VM's are turned off. Also, a snapshot is automatically created which can be used for rollback functionality in case the patching went astray.
3. DPM: Distributed Power Management
Everything is in light of the "green" environment. So trying to reduce energy levels are high on the priority list of managers. An excellent sales point for VMware. Not only does virtualizing 10 VM's on 1 physical server has it's obvious benefits, now they also have DPM. DPM will monitor your power supplies and activate and deactivate them as needed, thus saving on power (and air conditioning) costs.
4. Storage VMotion
As you already know, we can easily move running VM's from one host to another. Now, with Storage VM, we can relocate a running VM's virtual disk from one datastore to another. Although now it is still command line based, several people have developped a GUI.
5. HA enhancements
HA is now enable to restart individual failed VM's. That's cool, and expected, but what is coming next is even better. VMware is working on HA being enable to VMotion running VM's to another host if the original host has failed! So, VM's can be moved to a new host even after a host running the VM's has failed. A feature I thought that will be called Distributed Playback. But I'm not sure of the naming. Since it is still being developped VMware mentioned it only very quickly once. I'm sure we'll hear about it in the future.
6. Template broadcast
VM templates that are created can now be used across multiple datacenters.
More of the second day in the next post.

 Lots of interesting new features were introduced in the new VI 3.5 or are going to be implemented in future updates.
I've created a short overview of the most important new features I noticed at VMworld at Day 1:
1. ESX server 3i
Several types of Siemens, HP and Dell servers are going to be shipped with ESX 3i. With this, ESX is already installed and during the first power up of the server a few configuration options have to be chosen and your new ESX server is automatically added to your existing ESX environment. So basically, extra CPU power and Memory can be added to your cluster within minutes.
In ESX 3i, no Service console is included anymore and only a 32 MB hypervisor. For command line instructions, a remote console can be downloaded.
2. Update Manager
The Update Manager can patch your ESX servers as well as your Windows and Linux VM's, even if those VM's are turned off. Also, a snapshot is automatically created which can be used for rollback functionality in case the patching went astray.
3. DPM: Distributed Power Management
Everything is in light of the "green" environment. So trying to reduce energy levels are high on the priority list of managers. An excellent sales point for VMware. Not only does virtualizing 10 VM's on 1 physical server has it's obvious benefits, now they also have DPM. DPM will monitor your power supplies and activate and deactivate them as needed, thus saving on power (and air conditioning) costs.
4. Storage VMotion
As you already know, we can easily move running VM's from one host to another. Now, with Storage VM, we can relocate a running VM's virtual disk from one datastore to another. Although now it is still command line based, several people have developped a GUI.
5. HA enhancements
HA is now enable to restart individual failed VM's. That's cool, and expected, but what is coming next is even better. VMware is working on HA being enable to VMotion running VM's to another host if the original host has failed! So, VM's can be moved to a new host even after a host running the VM's has failed. A feature I thought that will be called Distributed Playback. But I'm not sure of the naming. Since it is still being developped VMware mentioned it only very quickly once. I'm sure we'll hear about it in the future.
6. Template broadcast
VM templates that are created can now be used across multiple datacenters.
More of the second day in the next post.
Thursday, February 07, 2008
Exchange 2007: adjust the default message size limits
Already noticed that in Exchange 2007 you cannot change the default message size limits anymore in the traditional Exchange management console?
In het Hub Transport of the Organization Configuration under Send Connectors we can see the various send connectors we have. But it is not possible to change the message limits here.

Of course, we can still change the message size limits on a "per user" basis under Recipient configuration - Mailbox.

Seems pretty excessive for thousands of mailboxes, no?
Of course, you can still change the default settings, but now it has to be done via the Exchange Management Shell.
First we can check how much the message size limit is at the moment with the command:
get-sendconnector | select identity,maxmessagesize.
Now we can change this to for example 20 MB by executing this command:
set-sendconnector "Connector Name" -maxmessagesize 20MB
Run the first command again to check if it worked:

O yeah, restart the Information store service and voila ... :)
In het Hub Transport of the Organization Configuration under Send Connectors we can see the various send connectors we have. But it is not possible to change the message limits here.

Of course, we can still change the message size limits on a "per user" basis under Recipient configuration - Mailbox.

Seems pretty excessive for thousands of mailboxes, no?
Of course, you can still change the default settings, but now it has to be done via the Exchange Management Shell.
First we can check how much the message size limit is at the moment with the command:
get-sendconnector | select identity,maxmessagesize.
Now we can change this to for example 20 MB by executing this command:
set-sendconnector "Connector Name" -maxmessagesize 20MB
Run the first command again to check if it worked:

O yeah, restart the Information store service and voila ... :)
Monday, February 04, 2008
Warning MSExchangeTransport, Event 15002, on Exchange 2007
So last week Friday I noticed in the afternoon I hadn't received a single e-mail today. I open the Exchange Management console and don't see anything wrong at first glance. The event viewer contains however a few warnings: eventID 15002

I think: "OK, a warning, I'll look at that later ..." and open a command screen to telnet the SMTP port of our Exchange 2007 hub transport server. I immediately get the error: 452 4.3.1 Insufficient system resources back.
Hhhmmmm ... insufficient system resources ... resource pressure constantly high ... Hey, those things belong together ...
So I do some research on Technet and start reading into this a little bit. Appearently this is a feature, not a bug ... and it's called back pressure.
What can we do?
Well it's obvious that the best way to go is adding the resource you are short off. In my case: disk space. The limit is 4 GB and I had only 3,8 GB left on my partition.
Now, if you don't have that option, there is a page on Technet that specifies which keys can be changed in the EdgeTransport.exe.config file (XML based) that you can find under C:\Program Files\Microsoft\Exchange Server\Bin.
For every resource that monitored a key is present that can be adjusted. Of course, Microsoft does not recommend this and warns that adjusting the config file can lead to poor performance and data loss.
Still, I think this is a good new feature, but it should be more visible, not just a warning in the event viewer

I think: "OK, a warning, I'll look at that later ..." and open a command screen to telnet the SMTP port of our Exchange 2007 hub transport server. I immediately get the error: 452 4.3.1 Insufficient system resources back.
Hhhmmmm ... insufficient system resources ... resource pressure constantly high ... Hey, those things belong together ...
So I do some research on Technet and start reading into this a little bit. Appearently this is a feature, not a bug ... and it's called back pressure.
What can we do?
Well it's obvious that the best way to go is adding the resource you are short off. In my case: disk space. The limit is 4 GB and I had only 3,8 GB left on my partition.
Now, if you don't have that option, there is a page on Technet that specifies which keys can be changed in the EdgeTransport.exe.config file (XML based) that you can find under C:\Program Files\Microsoft\Exchange Server\Bin.
For every resource that monitored a key is present that can be adjusted. Of course, Microsoft does not recommend this and warns that adjusting the config file can lead to poor performance and data loss.
Still, I think this is a good new feature, but it should be more visible, not just a warning in the event viewer
Deploying Sysprep on VirtualCenter 2.0
Everyone who has followed the VMware Infrastructure 3 four day course will know how to install Sysprep on your VirtualCenter so you are able customize new VM's during their deployment. But for people who are just playing around with it still, not having followed the course or people that have to dig really deep in their memory (like me) in order to come up with it again, I've created this small post. (their doesn't seem to be lots of info on this on-line ...)
Sysprep is not installed and distributed by VMware for a good reason. Sysprep is free for end-users like ourselves, but not if you want to distribute it ...
So instead of having you pay VMware for Microsoft technology, they just tell you download and install it yourself.
The steps are fairly simple, but the path to which to copy the files are mostly the problem:
1. Download the Sysprep Update Version 1.1 (Q257813_W2K_spl_X86_EN.exe) from Microsoft at this link (if they haven't changed it again).
Info: Validation will be required.
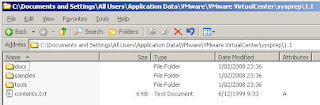
2. Extract the package and copy the files to the directory C:\\Application Data\Vmware\VMware
VirtualCenter\sysprep\1.1 . The result should look like this:
3. Download the Windows Server 2003 Service Pack 1 32-bit Deployment Tools (WindowsServer2003-KB892778-SP1-DeployTools-x86-ENU.cab) from Microsoft at this link (if they haven't changed it again).
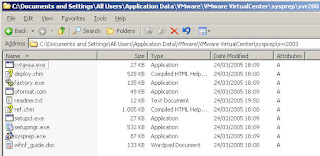
4. Extract the package and copy the files to the directory C:\\Application Data\Vmware\VMware
VirtualCenter\sysprep\Svr2003 . The result should look like this:
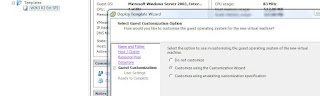
Now, we can use the Customize using the Customization wizard option at the template after which you can specify all the desired settings.
Of course, easier still, is sysprepping the VM you want to convert to a template prior to doing so. If an unattend setup is specified, the VM's that are deployed from this template will automatically have all the correct settings, specified in the unattend file.
How to sysprep a machine is not included here since there are hundreds of step-by-step guides of this on-line.
Have fun!
Sysprep is not installed and distributed by VMware for a good reason. Sysprep is free for end-users like ourselves, but not if you want to distribute it ...
So instead of having you pay VMware for Microsoft technology, they just tell you download and install it yourself.
The steps are fairly simple, but the path to which to copy the files are mostly the problem:
1. Download the Sysprep Update Version 1.1 (Q257813_W2K_spl_X86_EN.exe) from Microsoft at this link (if they haven't changed it again).
Info: Validation will be required.
2. Extract the package and copy the files to the directory C:\
VirtualCenter\sysprep\1.1

3. Download the Windows Server 2003 Service Pack 1 32-bit Deployment Tools (WindowsServer2003-KB892778-SP1-DeployTools-x86-ENU.cab) from Microsoft at this link (if they haven't changed it again).
4. Extract the package and copy the files to the directory C:\
VirtualCenter\sysprep\Svr2003

Now, we can use the Customize using the Customization wizard option at the template after which you can specify all the desired settings.

Of course, easier still, is sysprepping the VM you want to convert to a template prior to doing so. If an unattend setup is specified, the VM's that are deployed from this template will automatically have all the correct settings, specified in the unattend file.
How to sysprep a machine is not included here since there are hundreds of step-by-step guides of this on-line.
Have fun!
Subscribe to:
Posts (Atom)


