Again, since there is no GUI available, you'll have to compile a script to create your user accounts.
There are 3 possible ways of creating user accounts on your W2K8 core: create a vbs scripts, or use the DSADD or csv command line possibilities.
To create a vbs script, log on to your server and create a vbs file where you would like it with the command: edit c:\temp\user.vbs. In this case, I'll create a user.vbs file in my temp folder.
Then, we'll have to use our scripting knowledge to create the user and their desired attributes. I'm not going to elaborate on all the options, since there are too many, but here is the standard example which you can adjust to your needs:
Set objOU = GetObject("LDAP://OU=Users,OU=_Test,dc=fabrikam,dc=com")
Set objUser = objOU.Create("User", "cn=Kristof Vanweert")
objUser.Put "sAMAccountName", "KrVa"
objUser.SetInfo
Also, Microsoft provides a site on which you have a ton of script examples you can use to extract information: The Script Center Script Repository
CSV files are saved in a csv format, so to create one, we can enter edit c:\temp\user.csv. In the blue screen you receive you can enter again the information you want, for example:
DN,objectClass,sAMAccountName,sn,givenName,userPrincipalName
"CN=Kristof Vanweert,OU=Users,OU=_Test,DC=vm,DC=local", user,KrVa,Vanweert,Kristof,kristof.vanweert@vm.local
Notice that the first line declares all the variables that have to come back on every user you create below. Also, these variables are the same you can use in a vbs script.
When your file is finished, you can import it with the command: csvde -i -f c:\temp\user.csv. A list with all options you can add to the csvde command, you can find here.
Last, and probably easiest to work with, is the DSADD command. It features all the most important attributes, but not everything can be done with this command.
Users created with this command are saved in a cmd file: edit edit c:\temp\user.cmd which is later simply executed from the command line. In the command below, I create my user account in the correct OU and set a temporary password:
dsadd user "CN=Kristof Vanweert,OU=Users,OU=_Test,DC=vm,DC=local" -samid KrVa -upn KrVa -fn Kristof -mi THJ -ln Vanweert -display "Kristof Vanweert" -pwd Azerty123 -mustchpwd yes -pwdneverexpires yes
Again, a whole list of switches you can use, can be found at microsoft.
Of course, it is pretty obvious these commands can be adjusted to create OU's, groups, computers, ... Also modifying, deleting, retrieving information, ... can be done by changing a few parameters in the sample scripts posted above.
Have fun
Monday, October 29, 2007
Friday, October 26, 2007
Promoting your W2K8 core to Domain Controller
To promote our W2K8 core server, we need to have an answer file for an unattented installation, since the GUI is no longer available.
Our answer file we can create on an existing DC, for example a W2K3 domain controller.
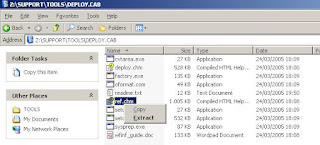
1. insert the W2K3 installation CD/DVD in your machine and extract the file ref.chm which is located in \SUPPORT\TOOLS\DEPLOY.CAB and select a destination
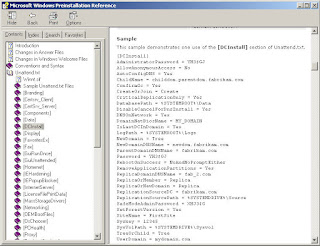
2. open the ref.chm file, click on Unattend.txt, then click on [DCInstall], scroll down to the example and copy this to a notepad.
3. adjust the answer file to your needs. Look for more information in the ref.chm file.
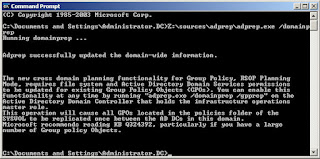
4. run adprep /forestprep on the installed DC to prepare the forest for a new DC. This can be found on the W2K8 installation DVD under Sources\ADprep. It should look something like this:

5. next is the domainprep
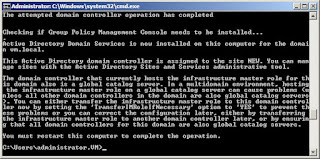
6. copy the file to your W2K8 core and run Dcpromo /unattend:unattendfile to start the promotion to DC
7. restart the server to apply the changes with the command shutdown /r /t 0
8. check on your original DC the Active Directory Users and Computers to see if your servre is now a domain controller
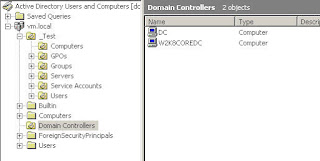
In this scenario, I've promoted my W2K8 core to a DC in an existing domain. Of course the same procedure can be applied to create a new domain or even forest.
Our answer file we can create on an existing DC, for example a W2K3 domain controller.
1. insert the W2K3 installation CD/DVD in your machine and extract the file ref.chm which is located in \SUPPORT\TOOLS\DEPLOY.CAB and select a destination

2. open the ref.chm file, click on Unattend.txt, then click on [DCInstall], scroll down to the example and copy this to a notepad.

3. adjust the answer file to your needs. Look for more information in the ref.chm file.
4. run adprep /forestprep on the installed DC to prepare the forest for a new DC. This can be found on the W2K8 installation DVD under Sources\ADprep. It should look something like this:

5. next is the domainprep

6. copy the file to your W2K8 core and run Dcpromo /unattend:unattendfile to start the promotion to DC

7. restart the server to apply the changes with the command shutdown /r /t 0
8. check on your original DC the Active Directory Users and Computers to see if your servre is now a domain controller

In this scenario, I've promoted my W2K8 core to a DC in an existing domain. Of course the same procedure can be applied to create a new domain or even forest.
Renaming and joining a W2K8 core to the domain
To further prepare our W2K8 core server for promotion to a DC, we'll have to rename it first and join it to the existing domain.
First we'll rename it, by following these steps:
1. type hostname, to receive your current machine name
2. now type Netdom renamecomputer OldComputerName /NewName:NewComputerName
 3. restart the server by typing Shutdown /r /t 0
Now that our server has the desired name, we can join in to our domain.
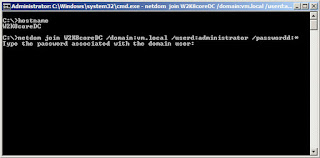
1. type netdom join ComputerName /domain:DomainName /userd:UserName /passwordd:*
By putting * behind the password switch, we can enter the password of the user when prompted without having to type it in clear text.
 2. restart the server by typing Shutdown /r /t 0
First we'll rename it, by following these steps:
1. type hostname, to receive your current machine name
2. now type Netdom renamecomputer OldComputerName /NewName:NewComputerName
 3. restart the server by typing Shutdown /r /t 0
Now that our server has the desired name, we can join in to our domain.
1. type netdom join ComputerName /domain:DomainName /userd:UserName /passwordd:*
By putting * behind the password switch, we can enter the password of the user when prompted without having to type it in clear text.
 2. restart the server by typing Shutdown /r /t 0
Configuring an IP address on W2K8 core
By default, your W2K8 core server will receive an IP address from a DHCP server that is connected on the same network. This address, can be reserved in your DHCP.
But of course, you can choose to configure a static IP address. Since I'm planning to promote this server to a DC, I'll need to give it a static IP address.
To do this, we'll have to learn some new command lines:
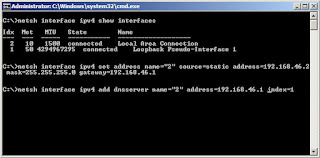
1. type netsh interface ipv4 show interfaces to receive a list of your NICS.
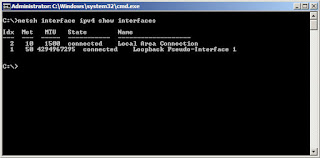
From the print screen you can see, I have 1 physical NIC in my server and 1 loopback address. Keep the Idx number in mind, we'll need it later
2. type netsh interface ipv4 set address name="ID" source=static address=StaticIP mask=SubnetMask gateway=DefaultGateway and replace the italic with the necessary information

3. type netsh interface ipv4 add dnsserver name="ID" address=DNSIP index=1 to set your DNS server
(Repeat this step as often as there are DNS servers in your domain.
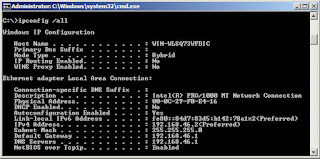
4. type IPconfig /all to see you results
To go back to a DHCP address, type netsh interface ipv4 set address name="ID" source=dhcp.
But of course, you can choose to configure a static IP address. Since I'm planning to promote this server to a DC, I'll need to give it a static IP address.
To do this, we'll have to learn some new command lines:
1. type netsh interface ipv4 show interfaces to receive a list of your NICS.

From the print screen you can see, I have 1 physical NIC in my server and 1 loopback address. Keep the Idx number in mind, we'll need it later
2. type netsh interface ipv4 set address name="ID" source=static address=StaticIP mask=SubnetMask gateway=DefaultGateway and replace the italic with the necessary information

3. type netsh interface ipv4 add dnsserver name="ID" address=DNSIP index=1 to set your DNS server
(Repeat this step as often as there are DNS servers in your domain.

4. type IPconfig /all to see you results

To go back to a DHCP address, type netsh interface ipv4 set address name="ID" source=dhcp.
Installing VMware tools on W2K8 core
OK, I’ve just installed my W2K8 core server on a VMware workstation without any problems, after all the process is a simple next-next finish (to begin with).
Before configuring my server I would first like to install the VMware tools, mostly because of the enhanced mouse & network drivers.
Since there is no standard GUI, we’ll have to go to long way to achieve this.
1. Access to VMware workstation tool bar and under VM, click on Install VMware tools. Now the VMware tool disk is connected to our virtual machine.
2. In the command screen, switch to your CD-drive
3. Type Setup and press
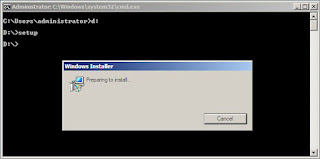
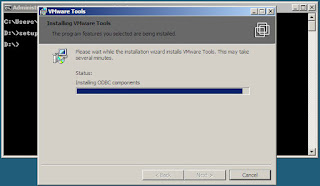
4. follow the GUI portion of the installation
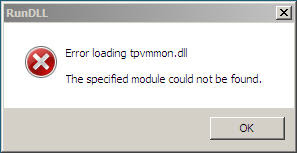
5. you will see an error message appearing.
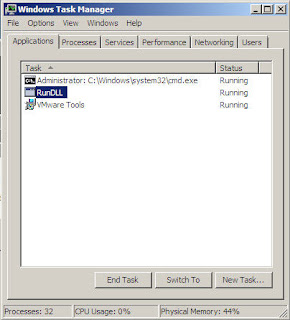
6. Type Ctrl-Alt-Ins to start the task manager, to go the Applications tab and end all the RUNDLL processes.
7. Close Task Manager and click OK to any error messages. Setup will continue as normal.
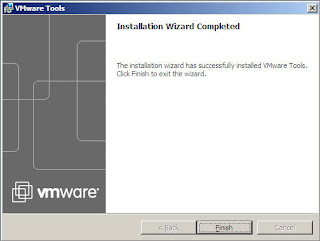
8. Click Finish and click Yes to restart the server
There is nothing more to it ...
Before configuring my server I would first like to install the VMware tools, mostly because of the enhanced mouse & network drivers.

Since there is no standard GUI, we’ll have to go to long way to achieve this.
1. Access to VMware workstation tool bar and under VM, click on Install VMware tools. Now the VMware tool disk is connected to our virtual machine.
2. In the command screen, switch to your CD-drive

3. Type Setup and press

4. follow the GUI portion of the installation

5. you will see an error message appearing.

6. Type Ctrl-Alt-Ins to start the task manager, to go the Applications tab and end all the RUNDLL processes.

7. Close Task Manager and click OK to any error messages. Setup will continue as normal.
8. Click Finish and click Yes to restart the server

There is nothing more to it ...
Subscribe to:
Posts (Atom)


